Spaghetti Bowl Layouts
From LdsigWiki
An important part of building a complete understanding of layout design is the set of interesting concepts that are used to design the so-called Spaghetti Bowl layout. This humorous name is attached to some simple and useful design ideas that will enhance the looks and operations of any layout. The Spaghetti Bowl can be built in small and irregular spaces or in large areas such as spare bedrooms and complete basements. This style of layout is a perfect solution to sharing a basement with the rest of the family.
Contents |
Introduction
To fully appreciate the ideas behind this planning method, certain allowances must be made to completely enjoy having this style of layout in your home or clubroom. The main layout design principles that are associated with this style of layout include the following:
- Tracks are allowed to cross the same area of a layout more than once. This action is generally referred to as "multiple times through the scene."
- Tracks considered as mainline tracks are allowed to cross themselves at grade while traversing the layout. Mainline tracks crossing themselves form elements called "junctions."
- Tracks are allowed to come close together and may or may not be at different elevations. Track separation (visually) is accomplished using small buildings, trees, cliffs, etc.
- Scenery is used as the primary tool for tying the various tracks together in a realistic LOOKING scene. While a thin line of trees may separate two different parts of the same mainline, the complete scene gives a reason for the "two" tracks being close together as they go through the scene.
The Building Blocks
Like all the available track planning methods, there is a bag of magic tricks that allows us to design a track routing in short order. Once we understand these Building Blocks and see some basic ways to combine some or all of the blocks in various basic configurations, the resulting layouts can yield lots of building and operating joy. The four basic Building Blocks are:
The Balloon Track
This track configuration is one in which a track is allowed to turn in a full circle until the track meets and connects to itself using a turnout. If the track connects to itself as soon as it comes together, we have the common reverse loop. If, on the other hand, we allow the track to parallel itself for a distance (a train length or so) before it connects to itself, we have the balloon track. This configuration lets the loop track appear to be a double track mainline or, if slightly separated, to seem like different rail lines. A simple and beneficial trick to do with this track configuration is to add a connection (like a crossover) between the two tracks, thereby forming a passing track.
The Continuous Loop
This configuration is nothing more than a segment of track that is connected together to form a closed loop of track. The simplest form of this style of loop is the small loop of track that comes with most train sets. This loop can be bent, twisted and made to go around the layout space 2, 3 or more times. When formed such that the loop of track is made to cross itself, you can use a crossing at grade (like a railroad junction in a city) or a bridge (like a mountain bridge crossing a valley). A simple and very useful loop configuration is the 3-Lap configuration. In this design, there are three tracks seen along the walls and/or along the edges of the layout space. The simplest example of this 3-Lap configuration has two places where the track loop crosses itself at grade (two small junctions or one large junction). This is an excellent example of a track plan if the busy time at a rail junction is your kind of railroading. A couple of passing sidings, a couple of spurs for industrial switching and a small yard added to the mainline plan, and a very nice layout will result that will fit your likes.
If you prefer a mix in your design, you can allow one of the tracks at either crossing to rise above the other so that you can use a bridge on your layout. This type of crossing is called an elevated crossing. Here, mountain scenery will replace some (or most) of the urban scenery (buildings, roads, retaining walls, etc.). The junction can be on one end of your layout space while the mountain trackage and scenery (hills, trees, rock cliffs, etc.) can be placed on the other end.
If you wish to have mostly mountain scenery, the 3-Lap loop can be arranged so that both crossings require a bridge. You can also hide one from view in a mountain and use tunnels in the scene. You can also feature an elevated crossing at the back of a valley modeled into your scenery. This valley idea works great when the crossing is along a wall at the back edge of your layout. The valley can be 3 or 4 feet long running towards the wall. You can place it so that a viewer can see the crossing only when they stand at a certain position at the front edge of the layout. This idea works best when the section of the layout is wide. A layout against a wall will need to be wide enough to turn the tracks at the end of the layout (like a tabletop layout). In HO scale, this width is on the order of five or six feet. This means that a valley could be 3 or 4 feet long. Make the valley narrower at the front, and you will end up with a very nicely isolated scene.
The Horizontal Helix
A variation of the continuous loop is the Horizontal Helix. If we add a second parallel track to the loop (like the common double track), we can then place a crossover between the two tracks. Next, we add a turnout to the inside track, allowing a train entering the inside track to go nearly around the loop before reaching the crossover. At the crossover, the train can then use the crossover to continue moving to the outside track of the loop. Add a third turnout to the outside track so that the train can make a loop and then leave the outside track, and we have the Horizontal Helix. If the crossover is set normally so that a train usually goes between the two tracks, we have a mainline run that starts inside the double track loop (at a yard) and continues until the train leaves the outside loop. At this point, we can add a second yard and the result is a point-to-point type of track plan.
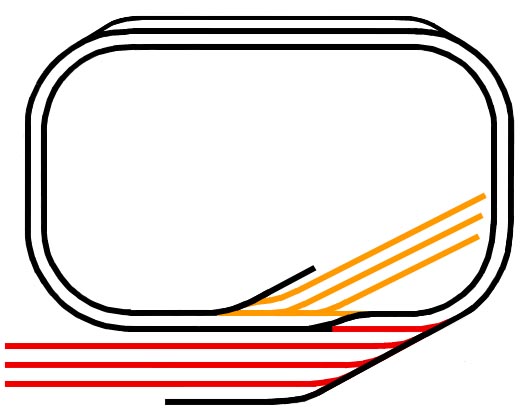
Figure 1
Two stub-end yards that are connected by a two-track Horizontal Helix (black) result in a Point-to-Point track plan.
This plan is HO-Scale and has an 18 inch minimum curve radius.
A variation to the helix is to separate the two tracks of the loop once in a while to provide a variation in the track route through the scenery. One of the tracks can go into a tunnel or through a cut to add yet more variety. If the 3-Lap loop is used for the Horizontal Helix, there can be a six lap mainline run on your layout between the two yards! Of course, if you wish to use a triple track loop for the 3-Lap, that is a total of nine laps without the train ever going on the same piece of track!
To add even more interest, you can place passing sidings anywhere along the track route. In this way, you can operate the layout as a true point-to-pint with the ability to run trains in both directions while making passes and meets. Add a few industrial spurs here and there and you can have quite a complete model railroad in a relatively small space. Please see Figure 1.
The Cut-Off
This final building block is nothing more than a segment of track that either provides a second routing along a segment of the loop or, in the case of the 3-Lap, a "short-cut" between one of the three laps.
Using the Building Blocks
You have just read the description of one of the possible combinations of the Spaghetti Bowl Building Blocks, namely the point-to-point scheme using the Horizontal Helix. In this example, the two yards can either be placed on the front edge of layout as in Figure 1 (i.e., the back edge is against a wall) or on opposite sides of the layout (e.g., there are access aisles on both sides of the layout). In either case, the size of the layout can be as small as 7 by 9 feet (using 18-inch minimum radius), have good size yards and provide lots of operation and just plain train watching.
Another possibility is to replace the yard on the inside of the Horizontal Helix with a Balloon Track. The siding portion can be bent to fit inside the helix. This results in a point-to-loop type track plan.
A third possibility is to replace the outside yard in the point-to-point scheme with the Balloon Track. In this case we let the siding portion of the balloon cross to the inside of the helix. This crossing (rail junction) can be made just before the start of the inside yard. This configuration adds a "big city" feel to the layout, since train operations are affected because switching may block trains going through the busy junction. This idea is shown in Figure 2.
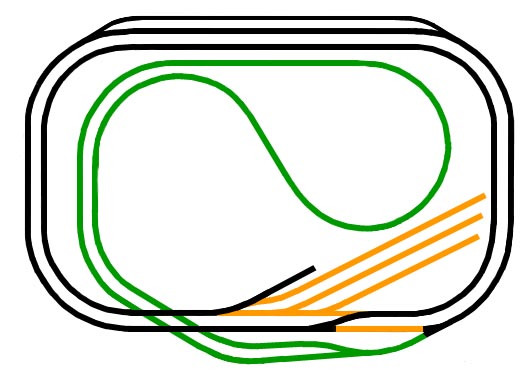
Figure 2
Using a Balloon Track (green) instead of the outer yard yields a Point-to-Loop track plan.
Remember to consider using a Cut-Off track when you find a chance. These are particularly good to use where you have junctions. The Cut-Off tracks then become interchange tracks, opening even more operating potential for your layout. Then, add a few industries and you have the plan shown in Figure 3.
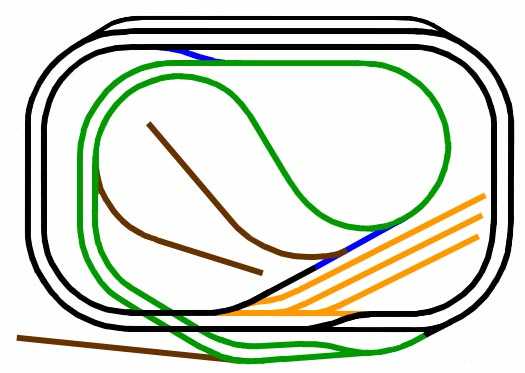
Figure 3
If some Cut-Off tracks (blue) and industrial spurs (brown) are added to Figure 2,
we have an interesting layout to run and operate in a space of 6.5 feet by 9 feet.
Of course, if you have a greater space, you can stretch a simple scheme into a larger layout.
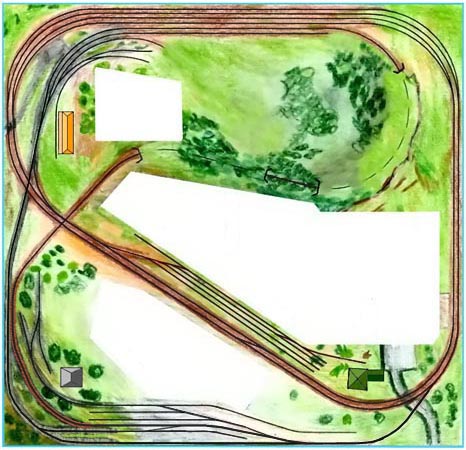
Figure 4
Here is the basic track plan shown in Figure 3, but stretched to fit into a 20 foot by 21 foot room.
Duck-unders allow access to the operating areas. The minimum radius is 42 inches.
Notice in Figure 4 that the "inside yard" has been pulled away from the lobe of the Balloon Track, and an operating area has been set in place. Also the two parallel tracks of the Balloon Track have been split apart slightly and a small yard placed in between the two mainlines.
Selection Criteria
When the Spaghetti Bowl track design is used for a layout there some benefits and there are some negatives. The way that you think about your layout goes a long way towards the type of layout that you choose. If you prefer to see and operate a lot of trains in a confined space (like a busy city junction with a nearby yard) or prefer to get the maximum track into mountainous scenery, then the Spaghetti Bowl plan might be the one for you. Something that you must consider when choosing a layout of this type is this: Even though this style of layout can have a long linear run (like the 3-Lap double Horizontal Helix), you see the trains go through the same scenes a number of times. This shifts the way we look at our layouts. When a train starts in a scene (junction) and goes through the same junction a second time, the mindset we use is that the train is actually going through a second junction. There the distance the train has traveled is the distance between the junctions. The same is true for industries, sidings, yards and towns. In this way, we have taken a busy mainline and instead of spreading it along all the walls of a room or basement, we have folded and twisted the mainline and place it in a large detailed scenery area. The mainline is still there; it simply has a different shape. We can therefore place the layout at the end of the basement and leave the rest of the area for the family.
The Good Points
Here is a list of some benefits of the Spaghetti Bowl:
- Maximizes the usage of a limited floor space.
- Provides lots of layout area for modeling scenery.
- Allows the use of a long mainline run in a smaller space.
- Maximizes operations by providing both real train operations and simply relaxing and watching your trains run. A chair is useful!
- This type of layout can share a basement quite well if it only occupies a corner of the total space in case your layout is not the "main event" in your family's life.
- This type of plan is very well suited to a tinplate or three-rail show layout.
- This style of layout can also provide for scenery with more depth.
- More of your layout buildings can be 3D model buildings instead of building flats due to larger scenes on your layout.
- You spend a higher percentage of your layout building time doing modeling (trackwork, scenery) instead of non-modeling tasks like benchwork and lighting hardware installation.
Some Other Points
Here is a list of some downsides of the Spaghetti Bowl:
- Requires more time to build (may not be a problem).
- Requires the use of a number of "access pits" to reach and maintain ALL track.
- More than twice through a scene was once a popular design trick for increasing mainline length but today is less favored by some who like once-through designs.
- Looping through scenes over and over again can become tiring unless you like to just watch trains run sometimes.
- Care must be taken when designing your scenery in areas where tracks are close together because scenes can appear two-dimensional.
More Reading
Here is a list of books and magazines that have information on the concepts we have been discussing.
- "Track Planning for Realistic Operation" by John Armstrong. Book published by Kalmbach Publishing. Book that describes all styles of track planning.
- "Model Railroading" magazine. Published by Highlands Station, Inc. Monthly track plans and the monthly columns `Behind the Scenes' and `On Track' have information concerning track planning.
- "Model Railroader" magazine. Published by Kalmbach. Monthly track plans have information concerning track planning.
About this content:
Original author: Jim Mansfield. Last revised on 10/14/00.
This LDSIG article is ©2000 by Jim Mansfield
Images courtesy of the awebsite4u.